
Project Timespan
November 2019
Inspiration
I’m a mentor for an organization called Apex for Youth, a non-profit dedicated to serving Asian and immigrant youth from low-income families in New York City. It has been a wonderful experience, and if you happen to stumble across this website and are looking for a volunteering opportunity, look no further than Apex!
One great feature of the program is its one-on-one mentoring. I have had the privilege of mentoring a soon-to-be 9th grader from Queens since he was in the sixth grade. We were matched up in part because we shared the common interest and appreciation for the field of medicine.
Therefore, one of the activities that I did with him was to teach him how to throw surgical knots, given that one of his career aspirations is to be a cardiothoracic surgeon! Before progressing to actual suture, we started with thicker string such that the knots could be better visualized.
Project Overview
In this post, I will go through the basics of knot-tying, followed by a section on model design and then a showcase of the final model in action.
On Tying Knots
As I did not participate in Boy Scouts growing up, nor have I finished my medical training or even started residency, I cannot say that I am an expert in surgical knot-tying. For more detailed information on knot tying, check out a link to this manual I found from ETHICON after searching on the web.
There are many ways to tie surgery knots, from single-handed throws to double-handed throws to instrument throws, and there are different types of knots to tie as well. The square knot forms the foundation for most suture knots, and details can be found in the manual linked above. For tying knots, my current preference is instrument tying followed by single-hand throws, but if I have to do the gun and the L, those are fun to throw as well!
Model Design
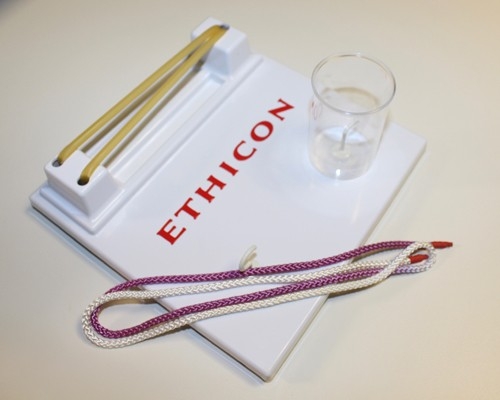
The standard knot-tying kit that medical students begin with consists of a plastic board with a raised platform on one side, on which a latex rubber band is stretched out in a v-shape.
Some kits incorporate additional features, such as a hook set deep within a cylindrical cup to simulate deep ties, but the rubber band part allows for practices of the basics of tying.
My initial designs tried to incorporate both the rubber band platform and the inset plastic cup, but I scrapped this as overly complex and opted to focus on replicating the v-shaped rubber band.
For example, instead of modelling a hook, which was part of the original Ethicon design, I tried to make initials of my mentee and I. Here is a model with my initials (AZ) mismatched with the name of my medical school roommate; I figured out quickly that the idea would not quite work given the fragility of the thin pieces and the poor functionality of the design, per se.
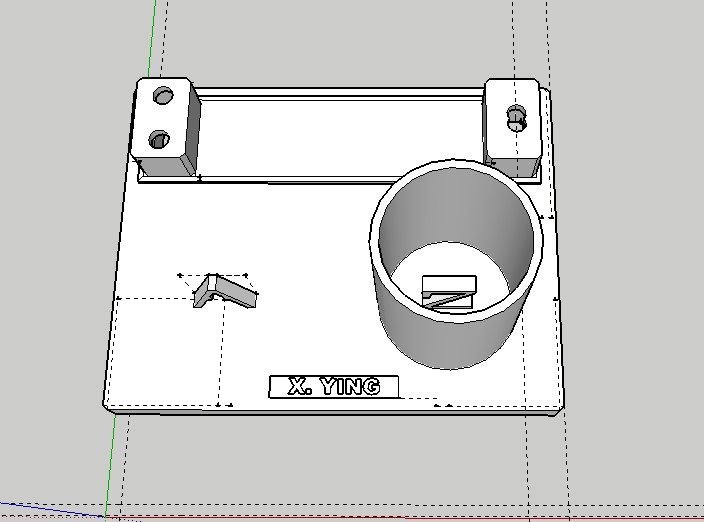
Believe it or not, I used the free version of Sketchup for the entirety of the 3D modelling. I didn’t have the exact dimensions of kits such as that produced by Ethicon, so I eyeball-estimated the dimensions I wanted for my custom knot-tying kit. It’s not a fine art or anything to push and pull 2D rectangles into 3D geometries, so I don’t have much to elaborate on this process.
One small point – to add some custom flair for my mentee and I, I added in the logo of Apex for Youth to the design; as it consists of simple geometric shapes, I could have recreated it from scratch within Sketchup, but I instead opted to load in an image of the file and extrude it into a 3D object that I then combined with the rest of the model design.
I exported the file as .STL into the standard MakerBot Print program that connected with the 3D printer in the medical school library. After printing out the model, I touched it up with some black and red acrylic paint for the Apex for Youth logo and for the nameplate.
Finished Model
To complete the model, I fed a length of latex rubber tubing through the two holes on the left side and then through the right side, tying a simple overhand knot to secure the tubing in place. The only other step before completion was to find a piece of rope for knot-tying: most kits use ropes of two-colors such that one can gauge whether or not the resulting knots are square and flat. I tied together a length of black string and a length of white string for this purpose.
I introduced the model to my mentee during one of the program workshop sessions, and he really took a liking to it! To secure the kit to the table, we used a couple of small plastic clamps. We practiced for a few sessions and he certainly made improvements on speed and technique!

Lessons Learned & Improvements
For a quick dive into making a custom knot-tying kit, I am happy by the way the model turned out; that doesn’t mean that I don’t have gripes with the final design, however. Here are a set of three improvements:
1. Addition of built-in clamps: I don’t even have to design 3D-printed clamps, as there are plenty of designs found online, but I could have been more thoughtful in finding a way to secure the knot-tying kit to a work surface such as a table.
2. Making a modular knot-tying platform: it would be fairly straightforward to add in the deep-set cup and hooks for deep and superficial ties if I had considered using modular design with multiple moveable smaller pieces.
3. Making wider holes on the model undersurface. It’s not like I even have sausage fingers or anything, but I remember it been an exquisitely painful process to tie the knot for securing the latex rubber bands down.
Reflection
When life presents you with twists and turns and tangles, make yourself a knot-tying kit!