
Project Timespan
~1 week in June 2018
Inspiration
After graduation, I spent a year on campus conducting clinical research. The research team was comprised of wonderful people who made it fun to go to work! That spring, one of my colleagues with whom I worked closely decided it was time to tie the knot. After he proposed, the thought occurred to me that it would be a nice gesture to make gifts for his wedding guests. The wedding was scheduled for that fall, but as I was leaving for graduate school that summer, we didn’t have too much time to spare. I had access to laser cutters on the engineering campus, so I pitched him some ideas using these machines to make wedding gifts. We decided that a set of coasters for each wedding party would work well!
Materials
>Baltic Birch Plywood, 1/4″: I obtained this from a local furniture workshop, but plywood can be found online or at big box stores
> Wood stain, some brownish color: Probably from Amazon. I think I ordered a 1 pint container
> Minwax Polyurethane, one pint container
> Clean cotton rags: Perfect use of old tee shirts
> Nitrile gloves: We used “extra” gloves from the lab
Total Cost: ~$80, mostly on account of the plywood
Project Overview
I had plenty of experience with laser cutters by this time, so I knew going in what to expect. I will write up a post on my laser cutting process some other time, but briefly, my workflow for this project consisted of the following:
1. Making coaster designs
2. Conversion to proper format
3. Prepping the wood
4. Lasering the coasters
5. Finishing coasters
1. Making Coaster Designs
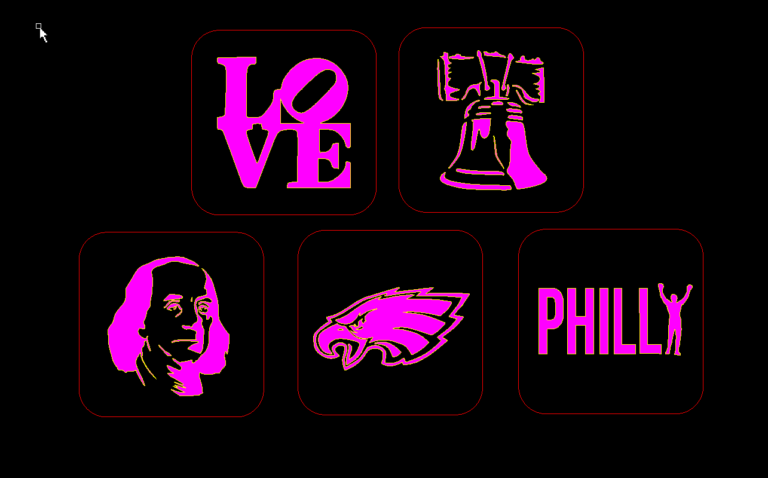
I made six designs for the set of coasters. I say “making coaster designs,” but I really mean mostly using images found online via Google Searches  . The last coaster type was customized with the names of the couple of their wedding date.
Note that we decided to go with a set of five coasters in the end: “LOVE,” “Philadelphia Eagles,” “PhillY,” “Liberty Bell,” and the personalized wedding coaster. The Benjamin Franklin design was ultimately scrapped.

Obviously had to include this one – it’s a wedding, after all! There are a couple (pun intended) of love statues in Philadelphia. One is by City Hall and the other is in University City

The 2017-2018 Philadelphia Eagles came off of their best season in franchise history with a 41-33 win over the New England Patriots in the Super Bowl.
I’m pretty sure the bride’s family are Pats fans, but the groom approved of this design!

Philadelphians are by and large proud, tough folk, as embodied by the character of Rocky Balboa from the boxing cinematic franchise. I thought this was a cool design incorporating the Rocky statue found by the steps of the Philadelphia Museum of Art.

The famous Liberty Bell, a symbol of independence – a bit ironic for a wedding coaster design, perhaps! I kid, I kid…

Old Benjamin Franklin almost made an appearance. Of course Mister Aphrodasiac has an aphorism on marriage: “Keep your eyes wide open before marriage, half shut afterwards.” We decided in the end to not use this design.

The final coaster was a personalized design with the names of the couple along with the date of their wedding. It ended up looking similar to the design of the square coaster on the right of the image.
Notice that all of the designs above are in black and white. The reason for this is that I wanted to raster etch the designs on the stained plywood, such that the black areas of the images will be the areas that the laser etches away while the white areas of the images will be left unperturbed.
For example, in the “LOVE” coaster design, the text is all in black, so the laser cutter will then selectively hit these areas and leave the background.
This process is the opposite of what I would have done if I used hardwood. With solid wood, applying heat (i.e. laser) would burn and darken the surface. However, plywood consists of layered wood sheets glued together in alternating wood grain patterns. In lasering away the top layer of ply, the laser cutter only then reveals the next layer of ply, making it very difficult to obtain a burned look in rastering plywood.
To address this issue, I first stained the plywood surface. Therefore, when the top layer of plywood is rastered away, the next layer remains the natural wood grain color and stands out in contrast to the stain.
2. Conversion to Proper Format
For the “PhillY” design and the “Liberty Bell” design, I used a free online image editor, LunaPic, to flip the black and white areas, as I wanted the stain to cover the background and raster away the foreground.
The program I used for laser cutting is called DraftSight, which sadly no longer is free. Alternatives include CorelDraw or Adobe Illustrator.
DraftSight is simple and easy to pick up and use. This project in particular only involved creating a square for the border of the coaster (with four small quarter-circle chamfers). I’m pretty sure I directly pasted the designs of most of the images into DraftSight. The program can then etch away the design based on the gray-scale values, where white areas = no raster and black areas = full raster. For the personalized coaster, I first traced out the lines as vector format that read “Eat, Drink, and Be Married” with Inkscape before adding in the names and date within DraftSight.
Here is a snip of the final coaster designs in DraftSight. The groom decided to forgo the Benjamin Franklin coaster, and the personalized coaster is not in the image above. Note that there are two shades of colors – the red outline indicates the engraving line while the pink shaded region marks the area for rastering.
3. Prepping the Wood
Drink coasters range in size from 3.5″ to 4″ in diameter. To play it safe, I designed each coaster to be 3.75″ on each side. The furniture store offered plywood in dimensions of 5′ x 5.’ As I didn’t have access to a table saw, I asked them to cut out the material to sheets that were 24″ on a side. Our end target for coasters was something to the tune of 75 coasters per design, or ~375 coasters in all. Assuming no overlap, 375 * 3.75″ * 3.75″ comes out to be 5,270 square inches, or 36.6 square feet. Therefore, I ordered two sheets for a total of 50 square feet of material.
4. Lasering the Coasters
As the laser cutters I used had a cutting bed of 18″ x 24,” I was able to fit in 24 coasters per bed. Therefore, I simply had the laser cutter cut out 24 coasters in parallel. I think at one point I had two or three laser cutters going at the same time. Our target was 375 coasters, and with 24 coasters per sheet, this amounted to about 16 beds full of plywood. Each job took about an hour or two, so it didn’t actually take too long to cut, all things considered. I made sure to engrave the outlines in two passes so as to limit the burning and decrease the laser kerf.
5. Finishing the Coasters
I put lasered coasters in bags to carry and discarded the wooden skeleton that remained in the recycling bin. I was very fortunate to have access to the Fine Arts building with a room full of workbenches with which I could place the coasters for clean-up and drying.
The groom and I spent an evening first wiping off burnt glue and stain residue from the sides of the coasters and burn marks from the bottom of the coasters. I found that damp paper towels work best!
Using wipe-on polyurethane (and gloves), we then coated the coasters in a couple thin layers of finish. We left the coasters on paper towels to dry. The room had windows on one side that we were able to pop open for circulation.
After the coasters dried, we loaded them up into the groom’s car. Project complete!
I didn’t take closeup pictures, inexplicably, but I did capture a panning video of all the coasters laid out within the room of the Fine Arts building.
Lessons Learned & Improvements
This project went very smoothly overall, and I do not really have any nits to pick with the project process. I only had a week or so to complete the project, and that I managed to do so (with much help from the groom) makes the project a success! Some ideas for design modification were to change the wood stain from a single brown to multiple stain colors (i.e. one for each coaster type) or to make circular coasters rather than square coasters. Another idea was to apply oil based stain, cover in painter’s tape, then raster away the design; next, apply water-based stain to hopefully hit the exposed plywood while leaving the background intact. One final idea I had was to make each coaster double-sided, with a non-personalized design on one side and the personalized design on the other. But time was of the essence and the presence of plywood repair holes made this less feasible still. Ultimately, however, these design characteristics are a matter of preference, and once I got the A-okay from the groom and bride, then that was good enough for me.
One thing to keep in mind with plywood is that quality is important. Graded “A” is best, of course, though at a minimum both sides should be surfaced. Also, gloves to keep your hands clean, and work in a well-ventilated space, especially if using oil-based stains!
Reflection
I was super pleased by the way the coasters turned out. The bride and groom are the nicest people ever, so it was really a privilege for me to help them out for their big day.
I did attend their wedding that fall, but I had to leave early and actually did not end up picking up one of the coaster sets for myself! But hopefully the other guests enjoyed them!